Monday, December 22, 2014

Getting to know Noosa

You may have heard the term "Noosa jewelry" or "Noosa charms", but have no idea what it is.
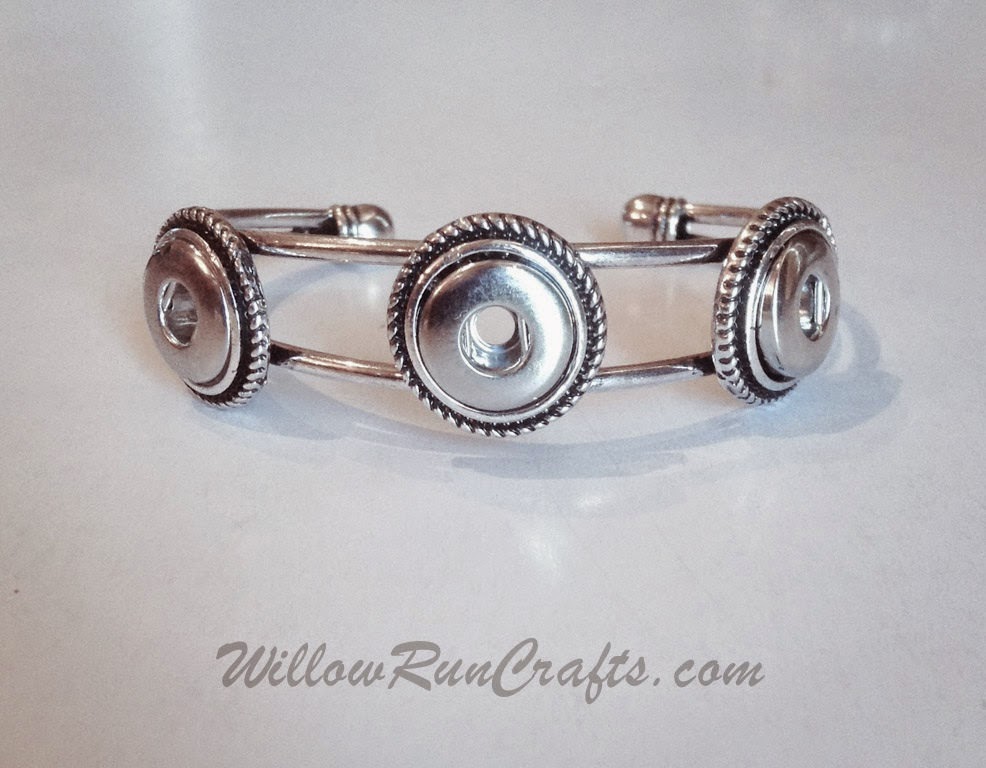
Well, let us introduce you! Noosa jewelry is a type of interchangeable snap jewelry. Our shops carry them in necklaces, bracelets, and earrings! We also carry the snaps and snap hardware. The great thing about Noosa is that you can swap out the snaps. So, matching outfits is never an issue!

Our newest style is a very pretty lobster clasp Noosa bracelet. It even has little crystals on the face of the design!

 
This is an example of one of Noosa cuff bracelets. We simply used some circle glass to decorate the snap!
This is an example of another cuff style we carry, and a finished product. Again, the colored snaps are interchangeable!
 
We also carry three colors of the traditional Noosa leather bracelets.


Here are some earrings....
 
Don't forget the Noosa necklace!
 
If you have any questions at all on our Noosa jewelry, just let us know! WillowRunCrafts@gmail.com 
 
You can find Noosa supplies at our stores:
or
 
 
#noosa #noosa jewelry #noosasupplies #noosacharms #snapcharms #snapjewelry


Tuesday, November 4, 2014

Butterfly Pendant- Ice Resin and Bezel Effects Paints!

In our experiences with bezel effects paints, we commonly see them used inside a bezel, finished off with resin. We decided to play a little and just use it as the background, instead of main focal point!


In this project, we used:
Butterfly sticker
Slices of polymer clay
Ice resin
Moon effects bezel paint (we used lilac)
Organza ribbon necklace
E6000 glue
30mm circle silver bezel
Craft Popsicle stick

1. First, we used our Popsicle stick to mix the bezel effects paint. You want to mix VERY well, even scraping the sides of the bottle to be sure all contents are mixed evenly. 


2. Make sure you blank bezel is on an even surface.


3. Once the bezel paint in thoroughly mixed, you can use the same stick and start dropping the paint into the bezel. Be sure to cover the entire surface inside the bezel.


4. Set aside and let dry. We allowed 24 hours, just to be safe. Once the paint is dry, you can add the butterfly.  We used E6000.


5. Next, we decided to add some polymer clay slices that are flower designs, just to give it a little more personality. We laid a few, poured a thin layer of Ice Resin, then laid the rest. Once all were laid out, we filled the remaining space of the bezel up to the brim with Ice Resin. You want to fill it enough that a slight dome forms. But be careful not to overfill! Set aside for 24 hours to allow it to set. ****Ice Resin loves dry, warm areas for setting****
 
6. Once dry, add your pendant to a necklace and you are done! We used one of our organza ribbon necklaces. Enjoy!


You can find these jewelry supplies and others at our shops
Www.WillowRunCrafts.com   or Www.Etsy.com/shop/WillowRunCrafts


Thursday, September 11, 2014

Grow Crystals for Jewelry!


A little while back, we heard about growing your own crystals.... To use in jewelry! So, we decided try our hand at it. And we think it was a success! Take a look!

1. First, we started with a cup of water. We added about 1 1/2 cups of water to our glass. You will want your alum salt on hand.


2. Next, we added the salt to the water. We actually had two cups. In one, we added 3/4 the little container of alum salt. In the second glass, we added 1 1/4 containers of alum salt. Stir it in VERY well. Now, set it aside for 10- 14 days. You can check in on it and you will see crystals start to grown after the first day or two! 


3. Once you see a good amount of crystals that have grown, you can move forward.


4. Now it's time to dump the water out.  

5. Now, you will want to remove the crystals. We used a butter knife and gently pried the chunks of crystals out. This is what they looked like.


6. Now is the fun part! Time to make jewelry! Just to experiment, we colored a few chunks with different colors of nail polish. 

 Then we moved to make things!


So, for the rings shown above, we tried a couple things. For the blue and purple rings, we colored the crystals with food coloring. With the blue ring, we colored the crystals first, then added to the ring. We used our E6000 glue. Once in place, we painted all crystals with clear nail polish to seal them.


For the purple ring, we glued the non colored crystals into e ring tray first, then painted on the food coloring. Once dry, we sealed with clear nail polish.


And for the peach colored ring, we glued in he non colored crystals, then painted with nail polish. That's how we got the color on the crystals. It was the color of the polish we used.


Next, we tried necklaces.

Here, we took a chunk of the crystals and painted with colored nail polish. We did one side, let dry, then the next. This was repeated for about 4 layers of polish to be sure the crystals would not break apart. We then gave the entire crystal pendant a coat of clear nail polish. Once dry, we glued on a necklace bail. And the pendant was complete!


We also added the crystals to our pendant trays. With these, we glued the crystals in first, then painted with many layers of nail polish. 


With this necklace, we added the crystals into the pendant first, then painted with food coloring. Once again, we sealed with a couple layers of clear nail polish. 


We also decided to add a few of our colored crystals and uncolored crystals to one of our glass globe pendants. 


Hope you enjoyed! Jewelry supplies we used are sold in our shops:
Www.WillowRunCrafts.com    and     Www.Etsy.com/shop/WillowRunCrafts


Monday, July 21, 2014

Pendants with Fabric!

So, recently, we were asked how it would look to use fabric or cloth in the pendant trays, instead of paper. This was something we had actually never tried before!

Sooooo, we thought we would share the experience! Enjoy!


Here we go! 
Please note- we used Judikins Diamond Glaze on the butterfly pendant and 3D Crystal Lacquer on the dress stand pendant. We wanted to see if there was any difference, but we didn't really notice any. 

Materials needed:
Fabric (enough to cover flat side of glass)
Scissors
Glass cabochon 
Pendant tray
Necklace strand 
Judikins Diamond Glaze or 3D Crystal Lacquer
E6000 glue or clear nail polish

Step 1.
Apply a thin layer of glaze to your glass cabochon. Carefully set wet side down on to fabric. You want the wet side to be applied to the side of the fabric you want showing in the pendant. Carefully press down and press out any air bubbles. This part is a little tricky because you also want to be sure the glass does not move from the area of your desired image. You may need to move it back to the original position if it slides.
Once in position and air bubbles are out, set aside and let dry. We left the fabric side up so that we didn't risk the cloth drying to our work surface. Dry time is approximately 10-15 minutes.


Step 2.
Once the glaze is dry, we just took scissors and cut around the glass cabochon. We didn't have it prefect, just cut as close to the edge of the glass as we could.


Step 3.
Now it is time to put the glass in the pendant tray. Here, you have two options. 
You can use the same glaze from step one. If you do this, you MUST use some clear nail polish on the inside of the pendant tray to seal it. Give it at least two good coats of polish over the entire inside of the tray. Let dry.
 
For some reason, the glaze and fabric combination on the tray can discolor the fabric if you do not seal the tray first. Once the polish is dry, just apply a coat of glaze to the back of the fabric and then press into the tray. Wipe off any glaze that oozes out. 


Or, your other option is to use E6000. With this option, all we did was cover the entire fabric area with E6000. Do not leave any fabric spots untouched by the E6000. A think layer will do just fine. Then press into the pendant tray and wipe away any excess glue.  


Step 4.
Once you have allowed time for the pendants to dry, just run a necklace strand through the loop and you are done!


You can find the supplies we used in our stores!
Www.WillowRunCrafts.com    or         Www.Etsy.com/shop/WillowRunCrafts


Saturday, June 21, 2014

Cotton Candy Crystal Clay!

As you may have realized by now, we love, love, love to play with crystal clay! It has a hardening ability of regular jewelry resin, but in a clay form. So, it opens yet another door for jewelry making possibilities!
 
It seems as though you really can place just about anything in this clay. We have used things from beads and charms, to micro beads and buttons. 

This is an example of the Cotton Candy colored Crystal Clay. We just placed the epoxy clay in a bezel, smoothed the surface, and added in some Swarovski chatons. Let it dry and harden, and you are done!


You can find this and many other colors of crystal clay at either of our stores:
Www.WillowRunCrafts.com   Or Www.Etsy.com/shop/WillowRunCrafts

#crystalclay #epoxyclay #jewelryclay #clayresin #diyjewelry #jewelrysupplies
#etsy #willowruncrafts

Wednesday, May 7, 2014

Bountiful Bows in Ice Resin- DIY Tutorial

So, we actually found the colorful little bows in the nail section at Walgreens. Who knew they would be so cute in jewelry?! And the next part, they are so colorful, it. An be worn with a variety of outfits!

It is so easy to make and we are here to show you how!

1. Start with a blank pendant tray.


2. Apply a thin coat of ice resin to bottom of the tray.


3. Now just start dropping in the colorful little bows! These are just slices of polymer clay. So, when searching, you can look for that if it helps. Once all bows are set, cover in ice resin. Fill to the brim of the tray. Set aside and let harden for 24 hours. **Pendant must be level**


4. Once hardened, add to necklace and wear! We added it to one of our organza necklaces. Enjoy!