Showing posts with label DIYjewelry. Show all posts

Wednesday, May 3, 2017

Ice Resin Luminous Layers

Looking for a great Mother's Day gift? Or even a new craft for yourself? 
Take a look at the Ice Resin Luminous Layers!
 Not only does this add depth because the paper is textured, 
but it catches light in the most dazzling way!


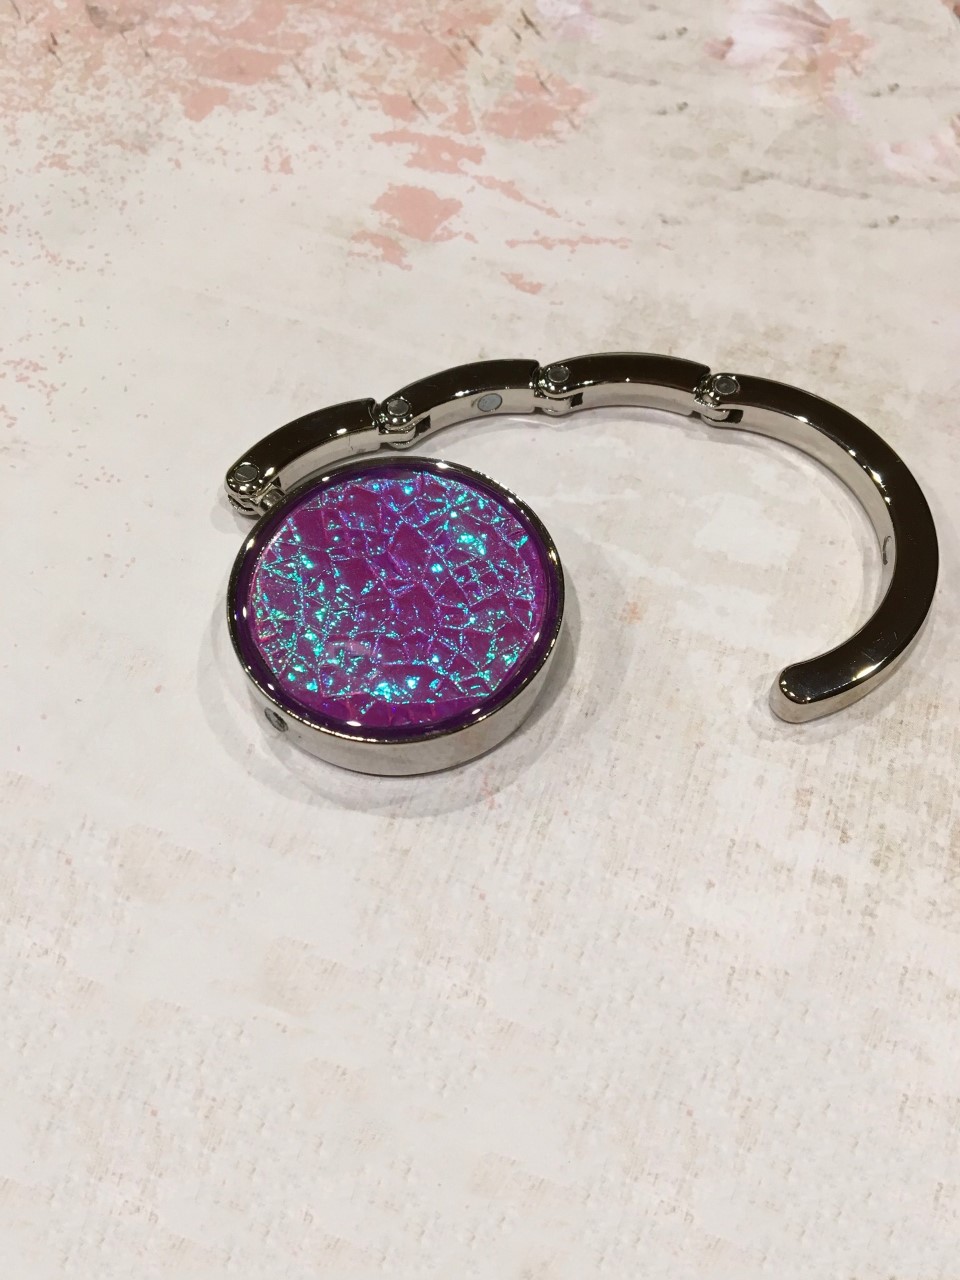
We used the Luminous Layers with our purse hook bezels. 
This example uses the purple colored sheet, with beautiful blue green undertones.


Each pack contains 2 sheets of each color!
  •  Pack includes 10 sheets, 2 of each 5 colors.
  • Each layer measures 3.75” x 4.5”
  • Use with ICE Resin®, Bezels, and more


 The color changes as light hits the textured paper. It absolutely amazing! 
The photos really don't do it justice.

 In this photo, the light brings out so much of the mint green color! And this is so easy to use. You simple cut or punch to the size of your bezel, mix up your Ice Resin or other jewelry resin, dab a bit of resin in to the tray to make the paper stick, then pour the resin over the paper to the lip of the bezel. Let it sit until it cures, and you are done!


You can find all the materials in the shops!
- Ice Resin
- Luminous Layers
- Purse Hook Bezel
- Scissors or Paper Punch

Take a look:
Www.WillowRunCrafts.com
or
Www.Etsy.com/shop/WillowRunCrafts

Enjoy!


Friday, March 11, 2016

New Snap Jewelry!

All new snap jewelry pieces are in the Etsy shop!
We are thrilled because being the lovers of snap jewelry that we are, it's always even more fun when we get new items in stock! 
Take a look!
These are our new one snap braided cord style. 


These next two are just excellent! With all the details- so much fun!


And finally, we have our soft leather varieties in four different colors!


Find these snap bracelets, as well as other snap jewelry findings, here:
https://www.etsy.com/shop/WillowRunCrafts?section_id=5859441

Enjoy!
Willow Run Crafts

#noosa #gingersnap #snapjewelry #noosajewelry #snapcharms #snapbracelets #jewelrysnaps

Friday, November 13, 2015

Brooch Pin Blanks!

Get them before they are gone!
We only have a small amount of the brooch pin blanks left, so don't miss out!

They will be grouped together as antique silver and antique bronze. 


In our example, we just added some Swarovski Crystals into Crystal Clay, and onto some drop pins! 
Find them here:
https://www.etsy.com/listing/155260641/4-antique-bronze-brooch-pins-10-antique
Enjoy!


#handmadejewelry #crystals #brooch #jewelrysupplies #diyjewelry #crafts #etsyseller #etsyshop #etsyjewelry #crystalclay #swavorski

Friday, September 18, 2015

Custom Photo Locket Necklace

Looking for a great custom gift for the holidays? Personalized Photo Lockets are always a winner! We can't think of anyone offhand that would not enjoy a gift that was personalized just for them! Soooo, we give you the Custom Photo Locket Necklace!


The mommy this was made for LOVES dragonflies! So, it worked out quite well!

We used the following materials:
Crystals
Crystal Clay
Paper Punch
Craft Scissors


Let's get started!
First, start with you blank bezel. Use your Crystal Clay and Crystal to decorate the sunken middle on the front of the locket. Let sit for 6 hours.


Next, punch out two photos you wish to use on the inside of the locket. Once you have those, take the first photo and apply an epoxy dome sticker over your image. This will be the image on the right hand side of the inner locket.
Once the epoxy dome is applied to the front of the image, apply the double sided adhesive sticker to the back.

Once it has been applied to the back of the image, place it carefully into the inside of the cameo setting. Use caution! The adhesive stickers are very strong and will be very challenging if you need to re-position the image.


Once you have the first image placed, move to picture number two. First, because our images were printed on paper, we used Crystal Lacquer to protect it, We applied one coat to both front and back. Set aside to dry.
Once dry:
Place an adhesive sticker on the back of the image like you did in previous image step..


Once the sticker is applied, you will place the image firmly into the left hand side of the cameo setting.


Now, the inside of the pendant is complete. Next step, add the jump ring. Once that is added, you can loop the necklace strand through the jump ring, and you are done!


We love the way these crystals change color in the different views....


Such a one of a kind and meaningful gift!


We hope you have fun making this!


For products we used, visit our shops:
or


#customjewelry #customgiftideas #personalizedgifts #customjewelry #diyjewelry #jewelrysupplies #cameobezel #customcameo #crystalclay #photopendant #handmadegifts #jewelrytutorial #dragonflypendant #epoxydome #suedenecklace


Tuesday, July 21, 2015

Sugar Shimmer Bracelet

Has anyone seen the textured nail polishes out on the market? To be more specific, we are referring to Sally Hansens Sugar Shimmer nail polish, or a like kind. Well, we had picked some up because it just looked really neat!
The nail polish has tiny little grain like beads, super tiny. And, it has a glitter shimmer to it. 


Sooooooo, of course we had to try it on jewelry! 


We used our circle bezel bracelet and glass dome cabochons. 


All we did was paint three of the glass domes on their flat side. We used multiple coats of the nail polish until we achieved our desired darkness of color. 
In truth, we originally were planning to paint all five glass cabochons in this manner. But then the experimenting kicked in. For the last two, we left the flat side blank, and painted the dome. 

If you look closely at the picture below, the circle on the left was painted on top of the dome. The circle on the right was painted on the flat side under the dome.


The thing we loved about the polish on this was the different effects it offered. Painting on the flat part showed more glitter and definition. But painting the dome side showed an awesome texture!


Thursday, May 28, 2015

Flower Bezel Bracelet

Ice Resin and Bezel Paints are so great together, we took things to a new level!
In this tutorial, we use the two, but add some embellishments as well!


Materials used:
Pebeo Prisme Fantasy bezel paint
5 bezel photo bracelet
Ice Resin
Flower embellishments
Craft mixing stick


 Step 1:
Mix your bezel paint. We use a craft stick or popsicle stick. stir very well, and be sure you mix in the paint on the walls inside the container as well.


Step 2:
Using the craft stick, drop a few drops of the paint into each bezel. Don't overfill. You just need enough to cover the bottom of the tray.

Step 3:
Set aside on a flat surface and wait for the paint to set. We waited a few hours to be sure it fully developed. You can see the honeycomb shapes forming. You can wait up to 12 hours to be sure it dries if you prefer.


Tuesday, April 7, 2015

Double Sided Adhesive Stickers

Looking for a quick way to add images to your pendant trays? Trying to avoid the use of glue or glaze? Wellllll, our double sided adhesive stickers are perfect!
And here is how to use them!

In the example below, we used the following materials:
1 Piddix image 25mm circle
2 double sided stickers 25mm circle
1 pendant tray 25mm circle
1 glass cabochon 25mm circle 
2 necklace strands- 1 brown rubber 1 brown leather

Step 1: Punch or cut out your image. 

Step 2: Peel sticker off sheet. 


3. Place sticker, sticky side down, on top of your image. Be very careful. Once placed, you cannot move it again. 


4. Carefully peel back the white paper on the sticker only. Do not touch your image directly. It will stick to whatever touches it now. 

Monday, February 9, 2015

Coloring Ice Resin

Looking for new ways to color your Ice Resin or other jewelry resin? Well, we did the dirty work for you! We experimented with multiple mediums to color resin. Take a look at the results. Enjoy!


Using eleven different medium, we colored resin. The finished charm bezels are how they looked after they dried. 
First, we tried a pearl lilac colored acrylic paint. Then a red glitter acrylic paint. And some regular tiny (but not fine) gold glitter. 

 
The pearl lilac acrylic paint mixed pretty well. But, it did not mix perfectly. Because of the pearl shimmer, there were lighter parts and darker parts once it finished drying.
 
With the red glitter acrylic paint, we were really surprised. Usually, when used as a paint, it dries clear with nothing but the colored glitter showing. But with the resin, it stayed the exact same way it was when we squeezed it out of the tube. It still had that milky look to it.
The fine gold glitter was interesting. It mixed well, but it seems that as it dried, the glitter started to settle towards the bottom. That was surprising since, as you will see, we didn't have this happen with any of the other bigger glitter chunks that we used.


Up next was nail polish and turquoise alcohol ink.


The nail polish is a prism colored nail polish. So, when you use it on your nails, it slightly changes color depending on the angle you look at it from. For example, with this nail polish, the overall color is kind of a brick red color. But then when you view it from another angle, it looks much greener. When we used it with the resin, it did not maintain this effect. It mainly held the primary brick red color.
 
The alcohol ink mixed very easily, and kept the color of the ink. It also remained almost completely translucent. It gave it almost a gemstone type look to it.


Here, we used little glitter hearts in a teal color. And then used a rose colored embossing powder. 

 
The glitter hearts kept their look and kind of made the whole bezel look bluish. But it wasn't bleeding the color. It just seemed to reflect that way. 
The embossing powder was neat. It colored very evenly, kept the color, and was also somewhat translucent. 


Next we tried fun things from Iced Enamels. 


The Relique enamel powder was very cool. Since it contains powder as well as heavier copper colored pieces, the different powder weights added dimension to the ice resin. 
The shattered opal glitter was very neat as well. It added dimension, kept the opal looking color, and made it so that it slightly changes color when you look at it from different directions. 


Next up was a shimmery red semi-gloss acrylic glaze. And fine hair like purple glitter. 


The acrylic glaze was very interesting. It mixed very well, but lost most of the orange highlight shimmer that it had. 
The purple glitter worked really well as an accent for the ice resin. The color didn't changeand the glitter didn't dull at all. It just looked really pretty.


So there you have it! We hope that our trials and experiments help you in your creative process. We absolutely love ice resin and it was a pleasure to do these tests. We will use any excuse to play with our ice resin!
 
If you are looking for Ice Resin, or other craft and jewelry supplies, just visit our shops!