Tuesday, October 17, 2017

Fall Sale

It's that time of year.... 
craft shows around every corner!
We want to help, so we are having a sale...
 
15% Off Your Order!
Use coupon code:
Fall15


Sale Starts now and ends Sunday, October 22nd, 2017 at 11:59pm EST.

Www.WillowRunCrafts.com

Or

Www.Etsy.com/shop/willowruncrafts

#craftsupplies #fallsale #crafts #wrc #fallcrafts #sale #diyjewelry #diy #craftlove #etsyshop #supplies #handmade

Monday, May 15, 2017

Pretty Resin Pendants!

Looking for yet another way to use Ice Resin Luminous Layers? Well, here you go! Resin Pendants!


This tutorial really is just a fun one. Popping the cured pendant from the mold to see it's final look is always a treat!
You will need the following materials:
Silicon molds
Necklace or Earring bail
Ice Resin
Mixing cup
Mixing stick
Luminous Layer sheet
Scissors or Paper Punch
Necklace (we used our rolo style)
Jump ring
E6000 glue

Here we go!

Step: Fill your mixing cup with the two parts resin. Must be even amounts for part A and part B. Then mix very thoroughly. Be sure to scrape the sides to ensure entire dosage is mixed well.

Step 2: Fill the mold up approx 2/3 of the way.

Step 3: Using scissors or paper punch, cut out your shape from your chosen Luminous Layer paper.

Step 4: Gently lay your layer in to the mold on top of the resin. You will want the textured shiny side to face down. Press the paper very carefully, to be sure there air did not get trapped when paper was set in. You can try to wiggle the paper a bit if that helps.

Step 5: Once the layer is positioned correctly, fill the rest of the mold with resin, up to the brim. Set aside on an even surface and allow the resin to cure. We usually allow 12 hours, just to make sure it is entirely hardened.

Step 6: Once cured, pop the resin out of the mold. Feel free to carefully trim off residual resin around the edges, if there is any.

Another view of the cured piece.

Step 7: Apply a small dot of E6000 to your bail on the glue pad.

Step 8: Carefully place the bail on to the back of your resin piece.

Here is a view of the back. Set aside to dry.

Step 9: Add a jump ring through the bail loop (if needed), then add the entire pendant to your necklace strand. You are finished!

The luminous layers really so eye catching! The texture they offer as well as all of the changing colors make any piece stunning!


Enjoy!
You can find materials in our shops:
Www.WillowRunCrafts.com
Www.Etsy.com/shop/WillowRunCrafts

Any questions, just let us know! Happy Crafting!
-Willow Run Crafts-

#luminouslayers #iceresin #resin #resinpendant #resinmolds #resinpaper #diyjewelry #handmade #etsyshop #E6000 #jewelryideas #craftideas #willowruncrafts #rangerink #jewelryresin #resintutorial

Wednesday, May 3, 2017

Ice Resin Luminous Layers

Looking for a great Mother's Day gift? Or even a new craft for yourself? 
Take a look at the Ice Resin Luminous Layers!
 Not only does this add depth because the paper is textured, 
but it catches light in the most dazzling way!


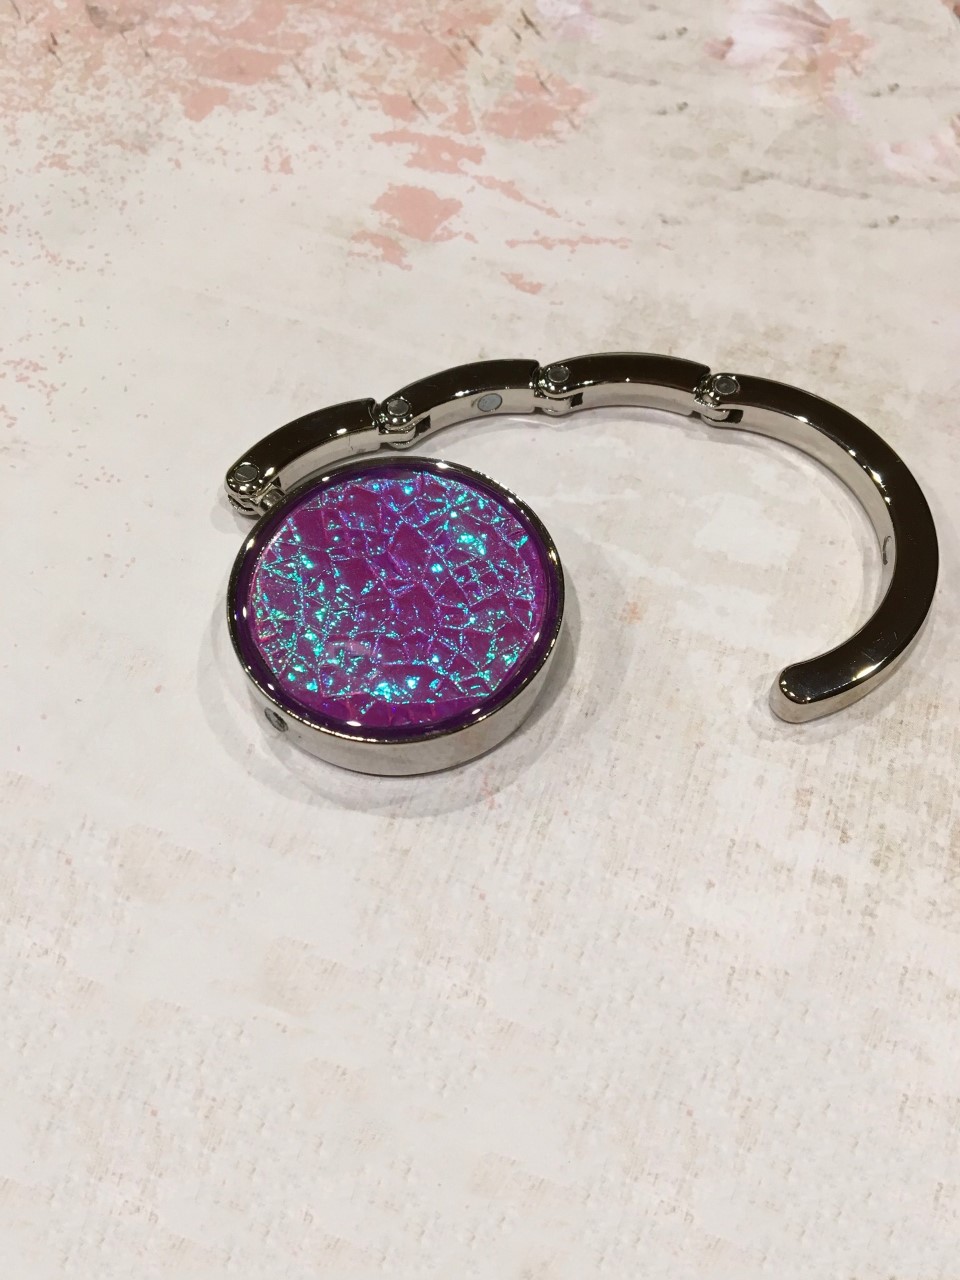
We used the Luminous Layers with our purse hook bezels. 
This example uses the purple colored sheet, with beautiful blue green undertones.


Each pack contains 2 sheets of each color!
  •  Pack includes 10 sheets, 2 of each 5 colors.
  • Each layer measures 3.75” x 4.5”
  • Use with ICE Resin®, Bezels, and more


 The color changes as light hits the textured paper. It absolutely amazing! 
The photos really don't do it justice.

 In this photo, the light brings out so much of the mint green color! And this is so easy to use. You simple cut or punch to the size of your bezel, mix up your Ice Resin or other jewelry resin, dab a bit of resin in to the tray to make the paper stick, then pour the resin over the paper to the lip of the bezel. Let it sit until it cures, and you are done!


You can find all the materials in the shops!
- Ice Resin
- Luminous Layers
- Purse Hook Bezel
- Scissors or Paper Punch

Take a look:
Www.WillowRunCrafts.com
or
Www.Etsy.com/shop/WillowRunCrafts

Enjoy!


Friday, December 9, 2016

Bracelet Giveaway

Win this Bracelet Kit!

How to enter:

Single entry if you post the name of your favorite Christmas cookie!

Double entry if you include a picture...

Triple entry if you include the recipe!


Random drawing will determine the winner.

Contest starts now and ends Sunday, December 11th, 11:59pm Est.

One recipe per person please. 

#contest #giveaway #christmascookie #cookierecipe #willowruncrafts #etsyshop #etsyseller #xmascookie #recipecontest #cookies #bracelet #wirelace 

Sunday, November 13, 2016

Fall Sale

FINAL DAY OF FALL SALE!

Enjoy 20% off all Necklaces,

Pendant Trays, and DIY Necklace Kits!


On Www.WillowRunCrafts.com

use promo code:

Happy20

No code needed in our Etsy shop!

Www.Etsy.com/shop/WillowRunCrafts


 Sale ends Sunday, November 13th at 11:59pm Est.


**Code must be used at time of checkout, no exceptions.**

**Cannot combine with any other coupons.**


#willowruncrafts #etsysale #etsyseller #jewelrysupplies #handmade #handmadejewelry #jewelrykit #necklaces #bezels #cabochon #diyjewelry

Tuesday, October 18, 2016

Batty Glowing Pendant Tutorial

Are you looking for a quick and easy Halloween craft? Our glow-in-the-dark pendant necklace will be right up your alley!


Materials needed:
25mm faceted circle glass
Silver heart necklace bail
Black leather necklace
E6000 glue
White nail polish
Glow in the dark nail polish
Glow in the dark nail polish with bats

Let's get started!

1. First, grab your faceted glass piece and your batty nail polish.
Apply one thin layer of polish. This will also apply a couple bats.


2. Then, using the polish applicator, fish out a few more bats from the bottle and place them on the glass tile where you desire. 
**The nail polish does not have to have bats in it, that just happens to be the one we found!**


3. Set aside and let dry. This is what it wil look like once dry.


4. Now, grab your regular glow in the dark polish. Apply a layer over the previous nail polish layer. We did this because this polish seemed to have a stronger glow than the bat polish.


5. Add as many layers of the regular glow in the dark polish as you would like. But be sure to allow to dry between applications. We did three layers. 


6. Once that dries, add two layers of plain white nail polish, allowing to dry between applications. Let dry.


7. Next, add just a small drop of E6000 glue to the glue pad of your necklace bail. Then, attach the bail placing the glue pad side on top of the white side of the faceted glass tile. Be sure it is where you want it. You will not be able to move it once it dries.


8. This is what the pendant looks like in the dark!
**This is glow-in-the-dark material, so it must have exposure to light to "charge" in order to glow. The glow lasts a few minutes. Flashing it with a flashlight helps recharge the glow very quickly!**


9. Add a necklace, and it is complete!


We hope you enjoyed this Halloween jewelry tutorial! Thanks for stopping by!
-Willow Run Crafts

Www.WillowRunCrafts.com   Or
Www.Etsy.com/shop/WillowRunCrafts

#halloweencrafts #halloweenjewelry #halloweendiy #diyjewelry #jewelrytutorial #batnecklace #glowinthedarknecklace #glowinthedark #jewelrysupplies #willowruncrafts #batpendant


Halloween Lace Ribbon Pendant Tutorials

Our new Halloween Lace Pendant Tutorial is actually 2 tutorials in one spot!
The pendants in the photo above are made two different ways. The one on the left has the lace ribbon UNDER the glass cabochon. The pendant on the right has the lace ribbon OVER the glass cabochon.

We will first focus on the under the glass tutorial.
Materials needed:
1 glass cabochon- we used 30x40mm oval
1 pendant tray- we used 30x40mm oval in antique copper
1 necklace strand- we used bead bar chain in antique copper
1 tube E6000 glue
1 pair scissors
Clear nail polish- optional
Lace ribbon- we used in black and orange colors

Here we go!

1. Start with your glass cabochon flat side up towards you.
 
2. Apply a thick layer of E6000 glue over entire flat surface of glass cabochon.

3. Place the glass, flat side down, onto the desired area of your lace ribbon. Press firmly to ensure any air bubbles are released from under the glass. Now, protect glass with a washcloth and stack weight on top as it dries. We like to let it dry under the leg of a heavy chair. Allow 10-20 minutes to dry.

4. Once dry, cut the ribbon around the glass. This does not have to be perfect since it will be going into a pendant tray.

Thursday, September 1, 2016

Sherbet Ombre Pendant Tutorial


Okay, we have to admit, we are in love with the Ombre nail polish pendant technique! 
This one reminds us of ice cold sherbet on a warm summer day!
 

How did we do it? We are happy to share!

Materials you will need: 
Applicator sponge
Popsicle stick
E6000 glue
4 colors of nail polish
White nail polish
Glass cabochon (we used this oval glass)
Pendant tray blank (we used this oval tray)
Jump ring (we used these antique bronze)
Necklace (we used this bead bar chain)

 
1. First, drop a few large droplets of nailpolish onto paper. Be generous with the polish. Continue this for all 4 colors of nail polish. Be sure you drop the colors close to each other, but not on top of each other.


2. Make sure the total area you have planned out with the polish will be enough to cover the area of glass. Looking at ours, we have enough! And, we will be able to fit all 4 colors on to the glass.
 

3. Now, you will want to grab your stick and gently blend the edges of the colors in to each other.
 

4. Next, grab your sponge. Place it gently on top of the nail polish. Be sure it covers all four colors. Press down on the sponge to be sure the polish sticks to it. Pull the sponge up.
 
 
5. Press the sponge on to the flat side of your glass. Be sure to press firmly. That will help ensure all 4 colors make it on to the glass.


6. Once you have the colors pressed on to the glass and it is the desired darkness of color, set aside to dry.
 

7. Once dry, paint over the colors (paint flat side) with white nail polish. This is just an additional way to make the colors more vibrant. Let dry.
 

8. Once the white polish has dried, apply a few dabs of E6000 adhesive to the flat side of the glass, over the white polish.
 

9. Press the glass into your pendant tray. Wipe away any excess glue. Attach your jump ring to the loop on the top of the tray. Set aside and let dry.
 

9. Once dry, attach the pendant to your necklace chain, and you are done!


Hope you enjoyed our Sherbet Ombre Pendant Tutorial!
You can find most of the materials used in our shops:
Www.Etsy.com/shop/Willowruncrafts
or
Www.WillowRunCrafts.com

Thanks for stopping by!

#Willowruncrafts #craftsupplies #jewelrysupplies #diyjewelry #jewelrytutorial #nailpolishjewelry #ombrejewelry #ombrependant #E6000 #pendanttrays #glasscabochons #ombrenailpolish